I found yet more curtains that would have changed my life six months ago when I was searching high and low for curtains for the living room.
One of the curtains I loved but quickly rejected were these Firenze quatrefoil panels from Ballard:
At $179 per panel, they were way out of my price range, since I needed at least four panels.
Yesterday at Pier One, of all places, I came across these:
They are a linen/burlap-ish kind of material with a light orange quatrefoil embroidery, with a tab/tie top. For $49.95 per panel.
Le sigh.
Thursday, August 5, 2010
Sunday, August 1, 2010
We are home!
We are home!
We are awake!
Its 4:54 am!
My children went to bed at their regularly scheduled time of 7 pm last night but got up for the day at 1 am!
I am tired!
My children are scavenging breakfast for themselves.....by eating the pizza crusts that I left on the dinner table last night.
International travel with three children under the age of five, one of whom has a severe food allergy and thus every meal becomes the Spanish Inquisition, is not really a "vacation". However, it was a lovely trip and we had a great time seeing the family.
I've been toying with starting a private family blog, a diary of sorts (name ideas, anyone? I was thinking the family joke of Whaddya say Bern...but that seems hard to spell). There I will post in excruciating detail every single day of the trip. What, don't you all love being forced to sit through other people's vacation pictures? I kind of hate that. I had a landscape architecture teacher in college who started half of his lectures with "now here are some slides of when I went on vacation in blah blah blah....heheh, isn't it great I get paid to force 200 youngsters to watch my vacation slides?"
I will, however, post a short (haha) recap of the trip.
Wow, I did a really good job cleaning out the fridge before we left. Our options for breakfast include lime juice, barbeque sauce, and.....nothing. I'm having a Milano cookie I found in my luggage. All the pizza crusts have been devoured by the children.
We are awake!
Its 4:54 am!
My children went to bed at their regularly scheduled time of 7 pm last night but got up for the day at 1 am!
I am tired!
My children are scavenging breakfast for themselves.....by eating the pizza crusts that I left on the dinner table last night.
International travel with three children under the age of five, one of whom has a severe food allergy and thus every meal becomes the Spanish Inquisition, is not really a "vacation". However, it was a lovely trip and we had a great time seeing the family.
I've been toying with starting a private family blog, a diary of sorts (name ideas, anyone? I was thinking the family joke of Whaddya say Bern...but that seems hard to spell). There I will post in excruciating detail every single day of the trip. What, don't you all love being forced to sit through other people's vacation pictures? I kind of hate that. I had a landscape architecture teacher in college who started half of his lectures with "now here are some slides of when I went on vacation in blah blah blah....heheh, isn't it great I get paid to force 200 youngsters to watch my vacation slides?"
I will, however, post a short (haha) recap of the trip.
Wow, I did a really good job cleaning out the fridge before we left. Our options for breakfast include lime juice, barbeque sauce, and.....nothing. I'm having a Milano cookie I found in my luggage. All the pizza crusts have been devoured by the children.
Friday, July 30, 2010
Art wall
In our old house, we had a blank wall separating the dining room from the living room. That wall was blank for nearly three years. I couldn't figure out what to do with it. Then, one day, the West Elm catalogue came. In it was this:
image via Sarah's Fab Day
I loved it, and it was the perfect size for the space. It wasn't cheap, so we saved up our pennies...and when I went to order it, it was sold out online. Waaah.
We went out to dinner on our anniversary in Philly, and did a little window shopping afterward, and happened upon a West Elm store. They had almost all the art in the gallery, so I bought it right then and there. I wasn't excited about the bird, so I picked a different print, but otherwise, I bought the entire thing and hung it up in my house the exact same way. (I'm not offended by mass-produced art. Don't judge.) The colors went really well with our autumn-ish color scheme. When we moved up here, we hung the gallery in our dining room.
Yes, they are all crooked. And yes, I took the picture with a flash, at night, and there's glare, so shoot me. Its the only picture I can find from the way it was six months ago.
I was not thrilled with our old furniture color scheme in the new space when we moved up here. Our new space is not quite as open and light-filled as our old place was, and everything seemed a bit dark and heavy. A few months ago I made a few changes in our living/dining room. I painted the bookshelves, dining chairs and credenza white, got a white slipcover for the sofa, got a lighter rug, and brought in some red/aqua fabrics.
The art in the gallery wall was a bit on the autumn side....yellowish reds, browns and oranges, which didn't really go with the new white/red/aqua. So I took a few out and put some new ones in.
I came across a bird wall decal in Target on clearance for $4. I cut out the sections I like, put them on a thick white paper (actually, I didn't have any thick white paper so I tore the back off of two of my kid's coloring books), and switched out the butterfly prints. Honestly, I know vintage animal anatomy prints are hot right now, but I never particularly liked them. I'm much happier with the birds.
I took out the squares and subbed in a bit of aqua quatrefoil fabric.
For the biggest frame, I found an etsy store that makes Keep Calm posters, and had one custom made in the red aqua.
I considered getting the For Like Ever poster, but it didn't fit the dimensions of the frame. I'm sure it will make its way into another room.
image via Sarah's Fab Day
I loved it, and it was the perfect size for the space. It wasn't cheap, so we saved up our pennies...and when I went to order it, it was sold out online. Waaah.
We went out to dinner on our anniversary in Philly, and did a little window shopping afterward, and happened upon a West Elm store. They had almost all the art in the gallery, so I bought it right then and there. I wasn't excited about the bird, so I picked a different print, but otherwise, I bought the entire thing and hung it up in my house the exact same way. (I'm not offended by mass-produced art. Don't judge.) The colors went really well with our autumn-ish color scheme. When we moved up here, we hung the gallery in our dining room.
Yes, they are all crooked. And yes, I took the picture with a flash, at night, and there's glare, so shoot me. Its the only picture I can find from the way it was six months ago.
I was not thrilled with our old furniture color scheme in the new space when we moved up here. Our new space is not quite as open and light-filled as our old place was, and everything seemed a bit dark and heavy. A few months ago I made a few changes in our living/dining room. I painted the bookshelves, dining chairs and credenza white, got a white slipcover for the sofa, got a lighter rug, and brought in some red/aqua fabrics.
The art in the gallery wall was a bit on the autumn side....yellowish reds, browns and oranges, which didn't really go with the new white/red/aqua. So I took a few out and put some new ones in.
I came across a bird wall decal in Target on clearance for $4. I cut out the sections I like, put them on a thick white paper (actually, I didn't have any thick white paper so I tore the back off of two of my kid's coloring books), and switched out the butterfly prints. Honestly, I know vintage animal anatomy prints are hot right now, but I never particularly liked them. I'm much happier with the birds.
I took out the squares and subbed in a bit of aqua quatrefoil fabric.
For the biggest frame, I found an etsy store that makes Keep Calm posters, and had one custom made in the red aqua.
I considered getting the For Like Ever poster, but it didn't fit the dimensions of the frame. I'm sure it will make its way into another room.
Thursday, July 29, 2010
Dresser makeover
We bought our dressers at a discount furniture place in Middletown, at a store that no longer exists. We were engaged, moving in together, and neither of us had any real furniture to speak of. The Mister had an Ikea bedroom set that fell apart if you looked at it. I had a bedroom set that my parents had bought me when I was 10.
Together we bought a set that was blonde laminate with a slightly mission style headboard, bed, dresser with mirror, tall chest of drawers and two nightstands. (I don't have any before pictures.) I did not particularly care for the style, but it was in our price range (which was very limited). The headboard, mirror and nightstands are no longer with us, but those dressers keep on trucking.
The dressers have lovely deep drawers that roll easily. At one point we split up the dressers, using the long one in our bedroom and the tall one in our son's bedroom. We've painted the dressers multiple times.
In the last five years the long one was painted burgundy, then chocolate brown, then a different color grayish brown. Here's a picture of the grayish-brown. (My bedroom no longer looks like this.)
The tall one was painted the most delicious green. I dont have a picture of the tall one painted green, but here's a picture of the changing table I painted to match it:
Now the two dressers have been reunited, and they have a slightly different paint treatment.
The sides of the drawers are beveled, and the larger drawers have an interior bevel as well. I taped off the bevel and painted the fronts of the drawers white.
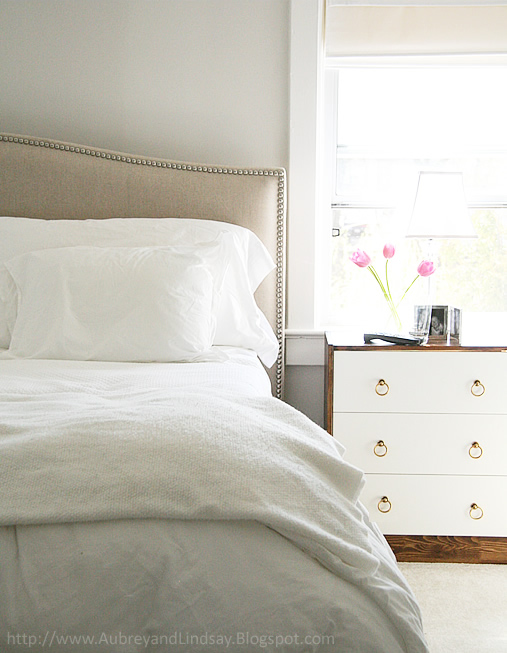
I really like this paint treatment, its got a very fifties/retro look to it. Next, I'd really like to switch out the hardware and replace them with silver ring pulls. I am having a hard time finding a plain inexpensive silver pull. This one is a bit too fussy but is the closest I've found. I'll keep looking:
The end result would look something like this inspiration picture from Aubrey and Lindsay's blog (see the whole post about how to make this nightstand here):
How do people take pictures like that? My pictures never look like that.
My only problem is that I need twenty-eight pulls. I have yet to find them for cheaper than $4 apiece. That's a lot of $$$$ hardware.
Together we bought a set that was blonde laminate with a slightly mission style headboard, bed, dresser with mirror, tall chest of drawers and two nightstands. (I don't have any before pictures.) I did not particularly care for the style, but it was in our price range (which was very limited). The headboard, mirror and nightstands are no longer with us, but those dressers keep on trucking.
The dressers have lovely deep drawers that roll easily. At one point we split up the dressers, using the long one in our bedroom and the tall one in our son's bedroom. We've painted the dressers multiple times.
In the last five years the long one was painted burgundy, then chocolate brown, then a different color grayish brown. Here's a picture of the grayish-brown. (My bedroom no longer looks like this.)
The tall one was painted the most delicious green. I dont have a picture of the tall one painted green, but here's a picture of the changing table I painted to match it:
Now the two dressers have been reunited, and they have a slightly different paint treatment.
The sides of the drawers are beveled, and the larger drawers have an interior bevel as well. I taped off the bevel and painted the fronts of the drawers white.
I really like this paint treatment, its got a very fifties/retro look to it. Next, I'd really like to switch out the hardware and replace them with silver ring pulls. I am having a hard time finding a plain inexpensive silver pull. This one is a bit too fussy but is the closest I've found. I'll keep looking:
The end result would look something like this inspiration picture from Aubrey and Lindsay's blog (see the whole post about how to make this nightstand here):
How do people take pictures like that? My pictures never look like that.
My only problem is that I need twenty-eight pulls. I have yet to find them for cheaper than $4 apiece. That's a lot of $$$$ hardware.
Wednesday, July 28, 2010
a kitchen makeover (part 2)
Here's the rest of sister's kitchen:
check out yesterday's post if you haven't yet - guest blogger again (Denise mom), talking about kitchen makeover projects I recently completed.
Next up, the counters need to be installed. We need to get a template made first, so we need to remove our old countertops and they come measure the cabinets, and then we have to wait ~2 weeks for the new counters to be installed – yes that means 2 weeks without any countertops, since we have already removed the old ones. Ugh. Once the template guys come, we run into another problem. Our cabinets aren’t level. Not noticeable to the eye, but enough that they need to be fixed before putting the super heavy granite on them or we’d risk cracks. There’s another unexpected cost. We need another professional to come in and do that for us. We’ve also realized that since tiling the floor, once we put the granite counters on top, we won’t be able to get the dishwasher out without completely removing the floor tiles if we ever needed to do repairs. And the oven is having other issues about its height and the difference in thickness between our old counters and the new ones. So the carpenter and my husband decides the best solution is to remove all the cabinets and raise them all a few inches rather than just shimmy them.
check out yesterday's post if you haven't yet - guest blogger again (Denise mom), talking about kitchen makeover projects I recently completed.
Next up, the counters need to be installed. We need to get a template made first, so we need to remove our old countertops and they come measure the cabinets, and then we have to wait ~2 weeks for the new counters to be installed – yes that means 2 weeks without any countertops, since we have already removed the old ones. Ugh. Once the template guys come, we run into another problem. Our cabinets aren’t level. Not noticeable to the eye, but enough that they need to be fixed before putting the super heavy granite on them or we’d risk cracks. There’s another unexpected cost. We need another professional to come in and do that for us. We’ve also realized that since tiling the floor, once we put the granite counters on top, we won’t be able to get the dishwasher out without completely removing the floor tiles if we ever needed to do repairs. And the oven is having other issues about its height and the difference in thickness between our old counters and the new ones. So the carpenter and my husband decides the best solution is to remove all the cabinets and raise them all a few inches rather than just shimmy them.
The cabinets get leveled, and back in the kitchen, the cabinet contents unfortunately stay in the dining room. We don’t want the contents getting dirty in the kitchen when the counter guys come back for installation. The day before the counter install, we disconnect the water to the sink and dishwasher, and put in the new connections. Oh, did I mention we needed new plumbing for the sink because of the different dimensions of new counters and sink (we did manage to get a free sink from the counter people, but had to buy the new hardware and plumbing accessories, and now my husband can add plumbing to his list of skills!) once the new plumbing was in and ready for the new counters/sink, the counter installers postponed our install by 3 days. Doh! So now we had no plumbing in the kitchen, and I was washing dishes in the basement. Not fun. Three days later the counters went in with no problems. And they look gorgeous!!

Backsplash time. We ended up purchasing mostly white subway tiles for the backsplash. We were trying to keep it fairly neutral (because we realize future buyers may not love orange as much as I do), and we liked the price of the subway tiles. We did think all white would be boring, so we chose a glass mosaic tile to create a border and a picture square above the stove.
Loving how it came out. the tile was pretty easy to put in, by this time the husband and I had a great little routine, him outside with the wet saw cutting all the pieces I was measuring for him (there actually ends up being quite a bit of cutting to go around outlets and corners and fit under cabinets. Tiles in, grouted, and edges caulked. And here’s the dramatic reveal.
BEFORE SHOTS:
AFTER SHOTS:
Tuesday, July 27, 2010
a kitchen makeover (part 1)
My other sister J has also agreed to guest blog for me...she and her husband have been slowly remodeling their house. One room they just finished was the kitchen, which looks fantastic, and she's going to share:
younger sister here (not sure if i have a code name or not? but i'm the mother of denise), guest blogging again. here for a kitchen makeover story. if i had my own blog, this post would take up a least a month on my blog, instead you get the condensed version in 2 days.
Does anyone else’s projects ever grow beyond the point of recognition by the time you are finished? This past winter, the husband and I decided to tile our floor. It used to be white linoleum… that our loving (and occasionally muddy) dogs had turned a lovely shade of grey-ish brown that no amount of mopping, scrubbing, and bleach could return it to white. Additionally, there were holes, yes holes, in the linoleum. When our golden retriever tried to tell us she hated the linoleum floor. And was determined to rip it up one patch at a time. We needed tile. Something nice and hard, dog resistant. And perhaps in a nice dark color (brown?) that didn’t show mud as easily - since our kitchen is a dual purpose mud room from the back yard (ugh).
So there we are, tax return money in hand, headed to the tile store to look at tiles for the floor. We are browsing through the store and keep looking at wall tiles. We are loving the glass mosaic tiles, pretty colors etc. we don’t need wall tiles, or do we? Well we do have this seriously ugly stainless steel backsplash behind our oven and a painted laminate backsplash over the counters that could seriously use some upgrading. And we do have some money burning a hole in my pocket… yes, we should probably get a new backsplash. Ok!
ugly before picture:
So who knows what happens next? Of course a new backsplash should not be paired with old counters. Unheard of! Especially when said old counters are ridiculously old laminate countertops that you painted a faux stone pattern on a few years prior, and have since decided is rather ugly. Ok, we can get new laminate countertops fairly cheaply to finish off this mini kitchen re-do. What? Your grade 1 granite is on sale? And we can get it for just a little more than laminate counters? Well, we obviously need granite countertops. Granite comes in various grades depending on the rarity of the stone – and the prices vary accordingly. Grade 1 is the lowest. The two granite places we looked at, had grades 1-4, I have no idea if there are even rarer stones (higher grades) that are for sale at super rich people stores I would never step into? Anyhoo. Apparently the husband and I both have champagne taste too (just like my sister). We blindly picked out the stone samples we liked. All grades 3 or 4 – which comes with a price tag approximately double of the on-sale grade 1. However, once we decided we liked the granite, there was no going back to laminate counters. And we certainly weren’t going to buy grade 1 granite when grade 3 and 4 were so much prettier!
First we pulled up the old laminate. Which took way longer than anticipated.
Next, you normally put down hardy backer. We bought a fairly new product – it’s a plastic padding layer called blanke underlayment that acts as the hardy backer, but cuts so much easier and cleaner than hardy backer, dries significantly quicker, and comes with a ridiculous warranty. More expensive, but way worth it. that layer went down super quickly.
And you can start tiling about an hour later (hardy backer in comparison needs a full day to dry). Laying tile is not quick. Between figuring out where to start so you don’t have tile slivers on the edges of the room, doing dry runs, and making cuts, getting the spacers just right so your tiles are straight, and that we were doing this after work in the evenings – it just seemed to take us forever. Did I mention I was 5 months pregnant doing all this?
Finally the floor is finished! (we obviously also grouted and sealed the floors once we finished laying the tile, but i won't bore with the details - we just followed the instructions on the bottles).
Stay tuned tomorrow for the counters and backsplash.
Monday, July 26, 2010
my sister is giving me a stabby necklace
My baby sister has kindly agreed to guest blog for me while I'm on vacation in Italy. She is very crafty--she knits, makes necklaces. She has her own blog I'm Super...Thanks for Asking. Drop by and visit!
I have a new hobby. Again.
I pick up hobbies the way a junkie picks up new track marks. Seriously. It's like CRACK for me.
As a bonus, my new hobby is also very self-serving for me.
I adore jewelry, however, for the last 3 years I have been working for an area of the company that I am not allowed to wear jewelry. It's been so bad, two (out of 8) of my earring holes have closed up...and I can't even go get them re-pierced since I can't wear the earrings long enough to have the holes last.
However, starting September 13, I will be working in a facility that actually allows me to wear jewelry. Unfortunately, I haven't really been keeping up with the purchasing of necklaces or earring since I couldn't wear them for so long.
So I've recently started making them for myself instead.
Initially, all I knew how to do was wire beads together with a pendant of some kind. These are two of my first attempts at making a necklace. The one on the left is a little elaborate, but still a pretty basic design.
However, I LOVE the colors and the pendant and pretty much EVERYTHING about the necklace even if it is pretty simple. The one on the right was initially for my mom, but she ended up taking a different necklace as a birthday gift, so I still have it.
I then learned how to use wire to make a more elaborate and "finished" looking necklace.
This was my first wire necklace and I actually think it's very pretty looking. However, it kind of sucks to wear because it has a bunch of sharp edges from where I suck at cutting the wires. I'm working on fixing that.
I have a made a few more wire necklaces, and I think I'm starting to get better. I ADORE both of these necklaces.
I mean, look at the AWESOME wire sculpting I did on the turquoise necklace. (Ha...I am so modest...). And the heart. Who doesn't love an awesome pink and green necklace?
And last but not least, my sister had requested a green necklace so I decided to make one for her today. I didn't think the pendant would like right with the wire, so I just used simple beading...but I still really like it. I just hope she does too!
So, with all these new necklaces, I'm looking forward to having a job where I can wear jewelry again. Only a month and a half to go!
Subscribe to:
Posts (Atom)